1. Install and first run
Pin the icon to your toolbar
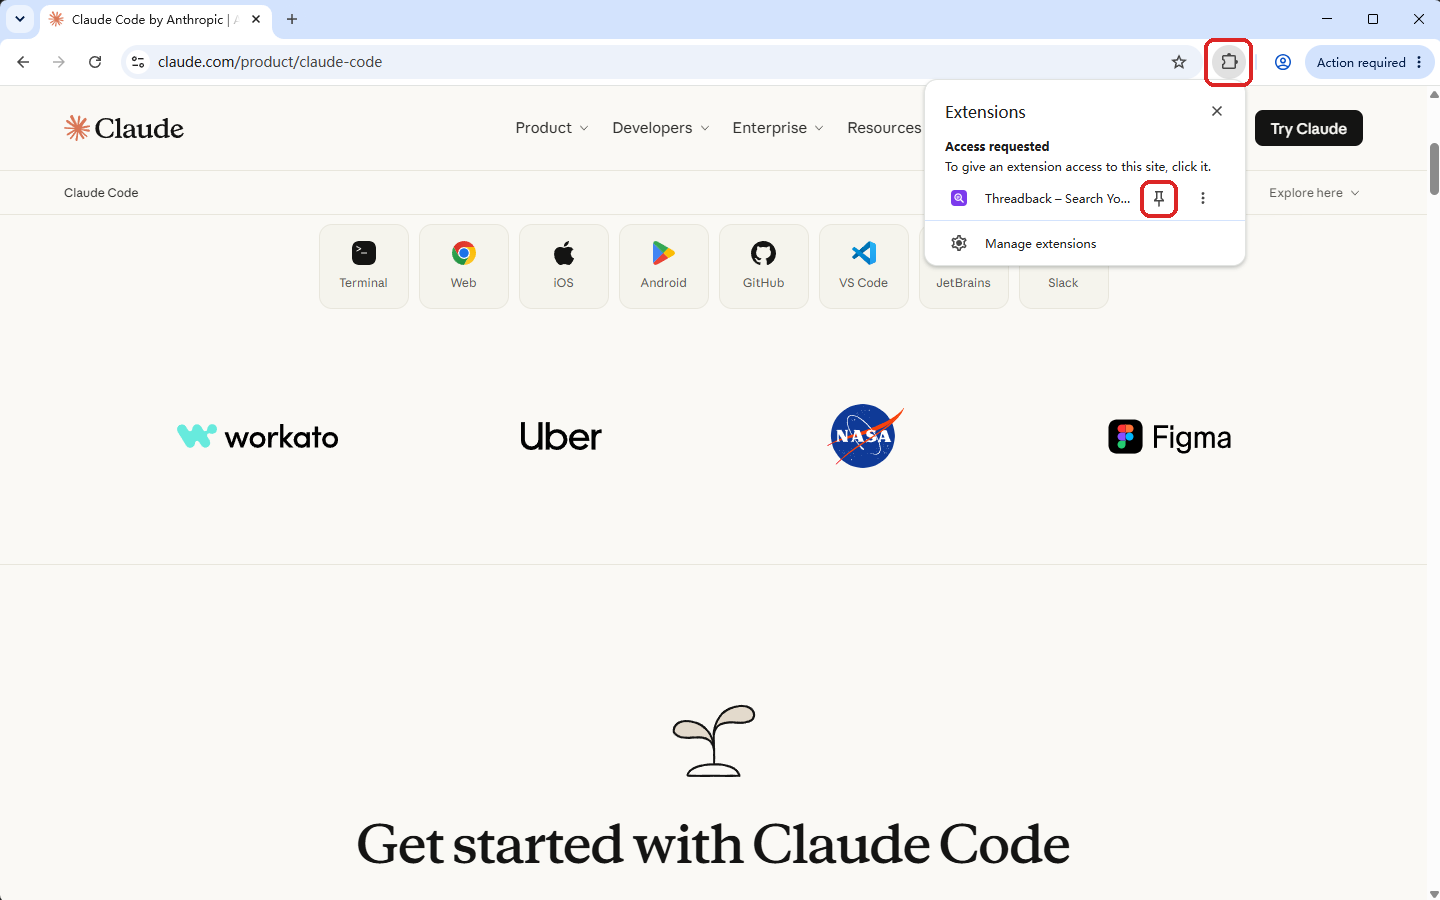
- After installing, click the puzzle icon (Extensions) to the right of the address bar.
- Find Threadback in the list and click the pin next to it.
- From now on, clicking that icon opens the extension panel.
The setup page: choose platforms and sync
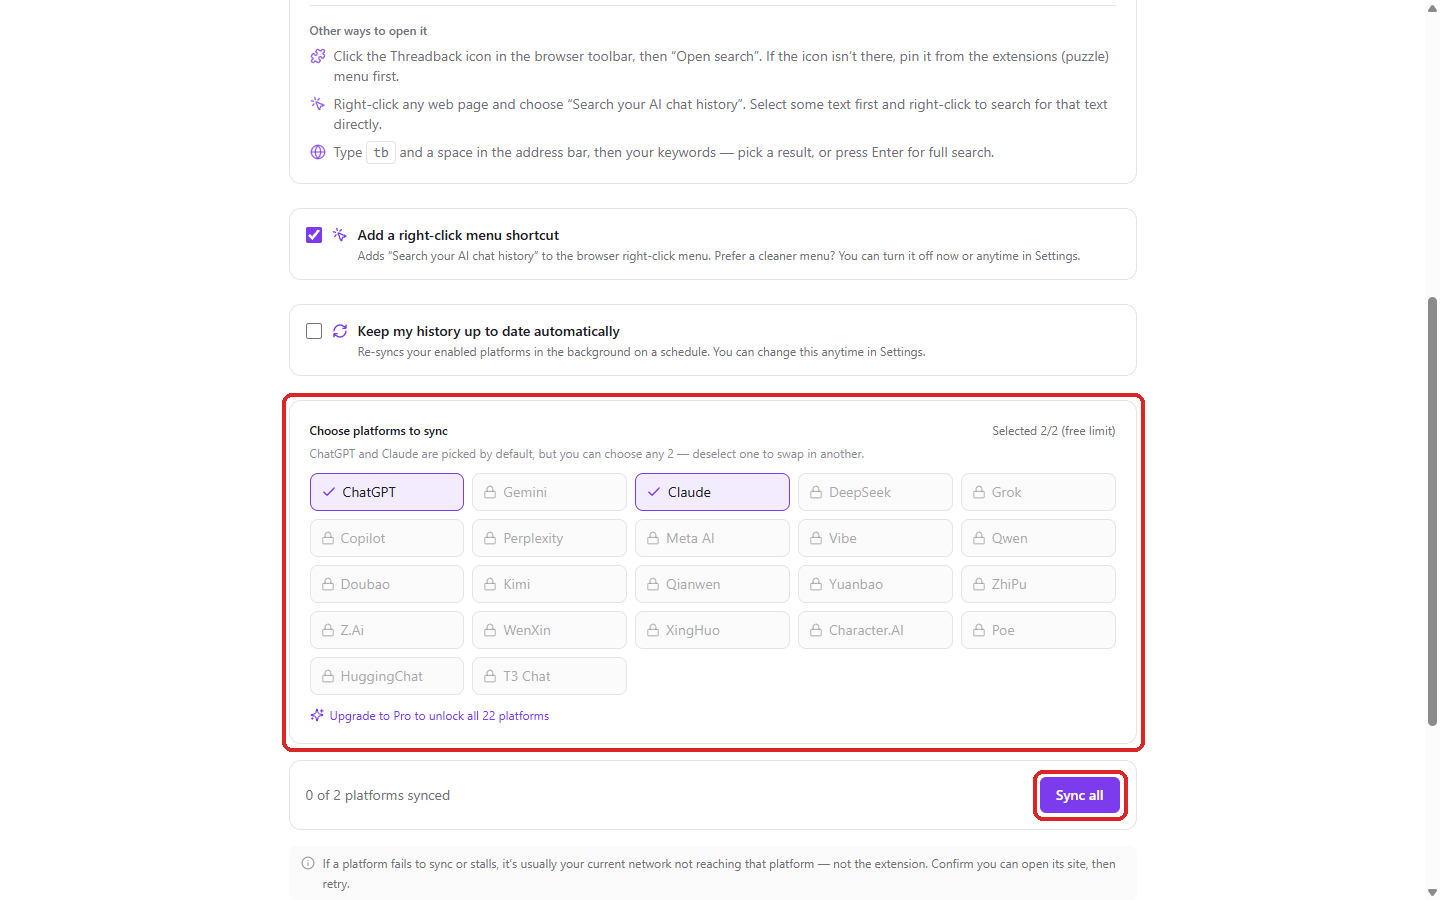
- A setup page opens automatically after installing. The top of it lists the ways to open search (see section 2); the shortcut alone is enough to get going.
- Under "Choose platforms to sync", tick the platforms you use. ChatGPT and Claude are pre-selected; the free tier allows 2 at a time, so untick one to swap it for another.
- The greyed entries with a lock are simply the ones beyond the free limit — untick a selected platform to swap one in. Platforms you are signed out of are flagged separately, with a button carrying that platform's name ("Open ChatGPT", "Open Claude" and so on); click it to sign in, then come back.
- Click "Sync all" to start the first sync. It runs in the background, so there is no need to wait for it.
- Once part of the sync is done, you can search in the try-it box further down; its "Open full search" link shows every result.
- Click "Done" at the bottom or simply close the page whenever you like: your choices are saved instantly, and platforms not synced yet will sync the next time you open them.
The setup page only appears once, right after installing. Everything on it can be changed later in the settings.
The extension panel
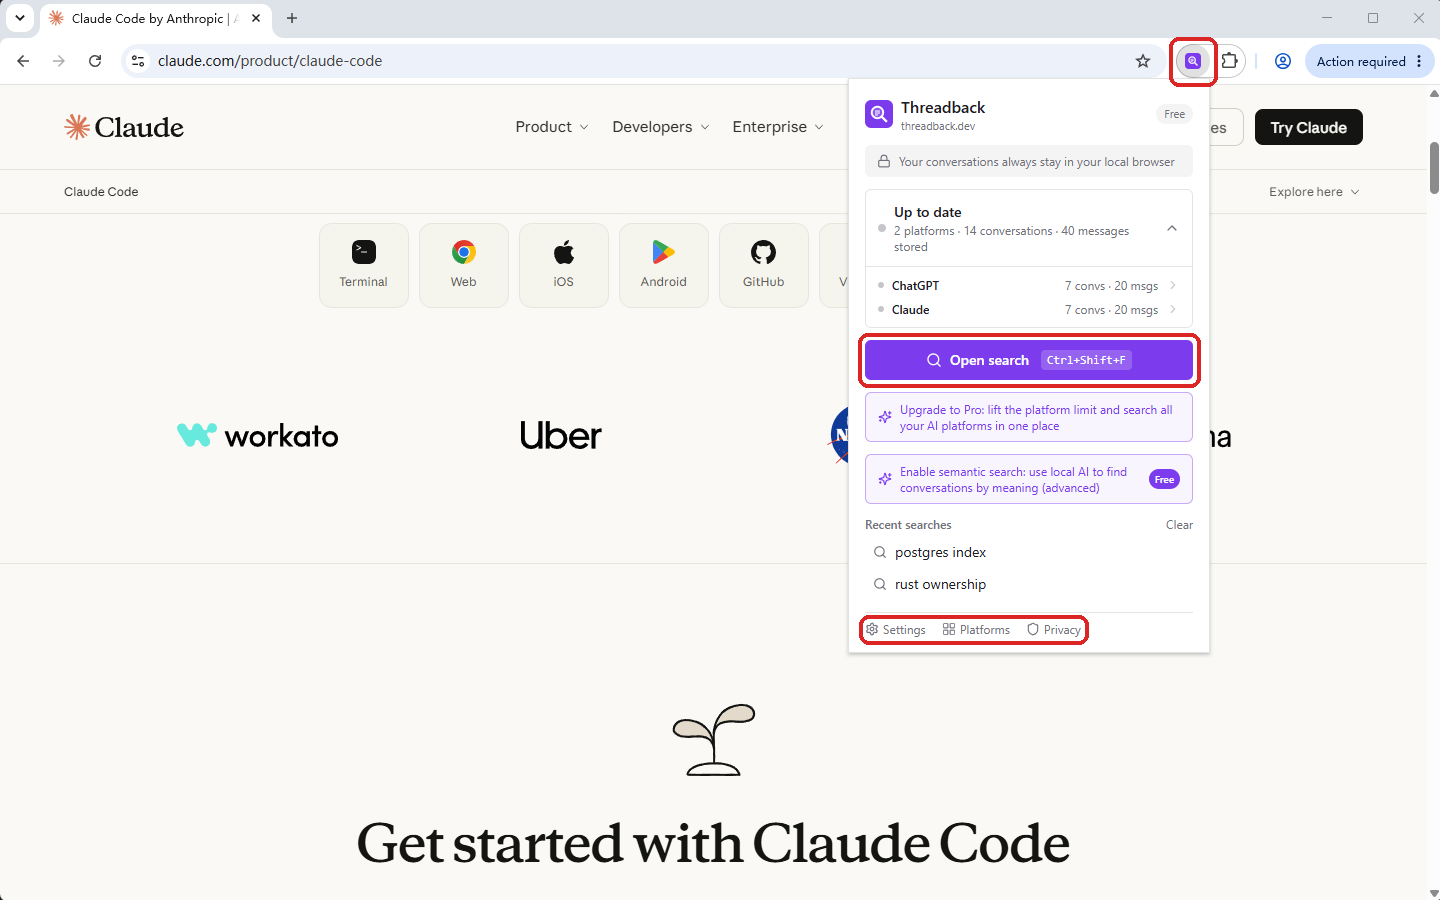
- Click "Open search" to open the search window; the shortcut beside it does the same from any page.
- Click an entry under "Recent searches" to run that search again, or "Clear" to empty the list.
- When a conversation seems to be missing, check the status card first: it gives the number of enabled platforms and everything stored so far, and expands to per-platform status.
- Everything else starts from "Settings" at the bottom — platforms, library, export and backup all live there.
2. Search your conversations
Four ways to open search
- Shortcut: press Ctrl+Shift+F (⌘+Shift+F on macOS) on any page; the search window appears over it.
- Right-click menu: right-click a page and choose "Search your AI chat history". Select some text first and the menu searches that text directly.
- Address bar: type tb, press Space, then your keywords.
- Toolbar icon: click the Threadback icon to open the panel, then "Open search".
On browser-internal pages (settings, extension stores, new tab) an overlay cannot be injected, so the shortcut opens the search page in a new tab instead. It works exactly the same.
Using the search window
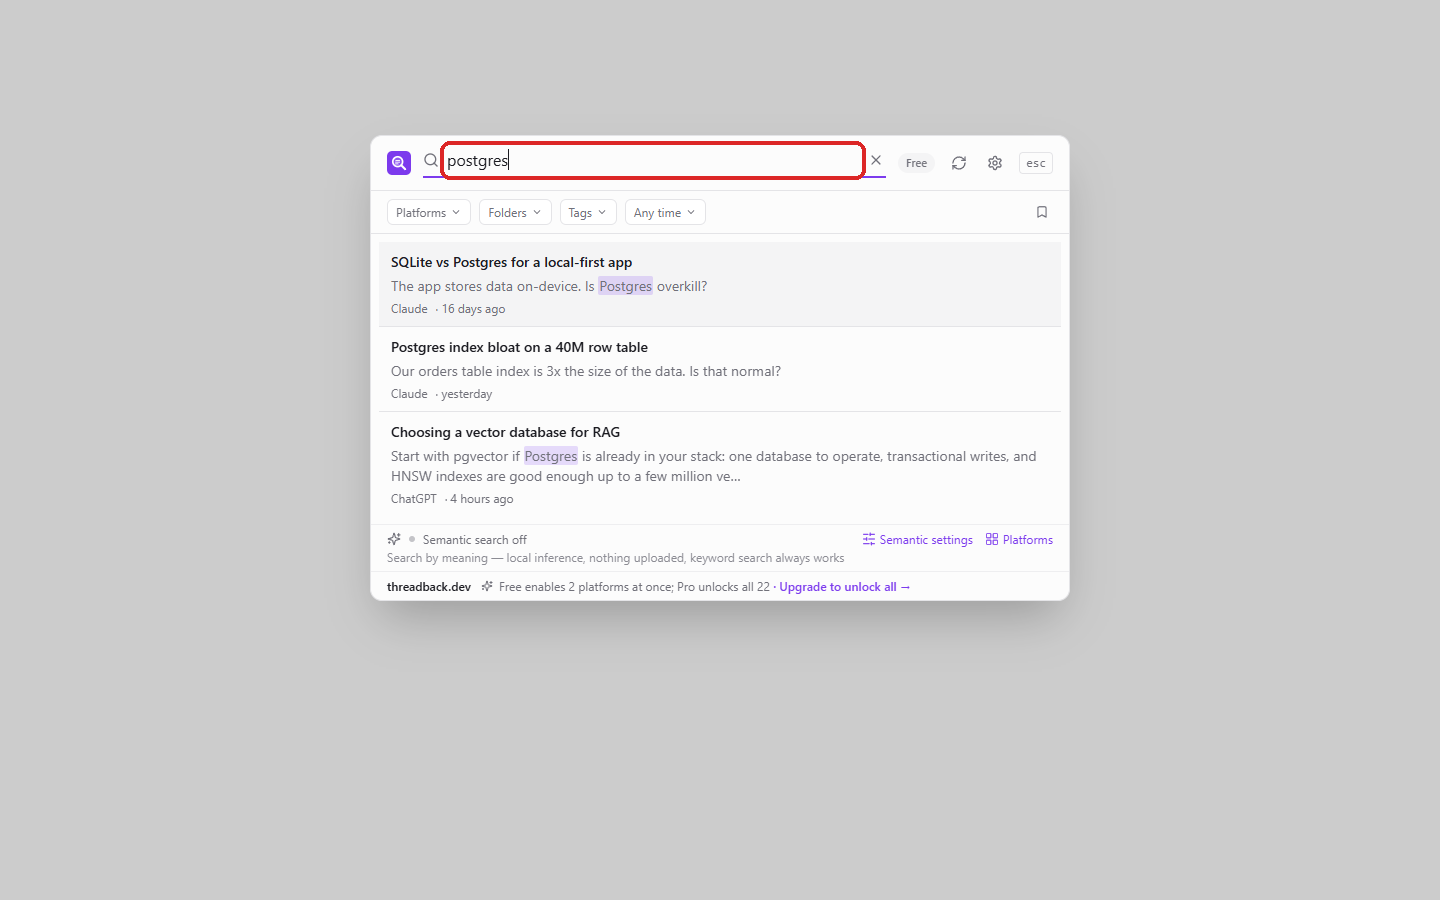
- The cursor is already in the box — just type. Results appear as you type, no Enter needed.
- One row per conversation, not per message — the snippet shows where your words matched.
- The × in the box clears the text only, not your filters.
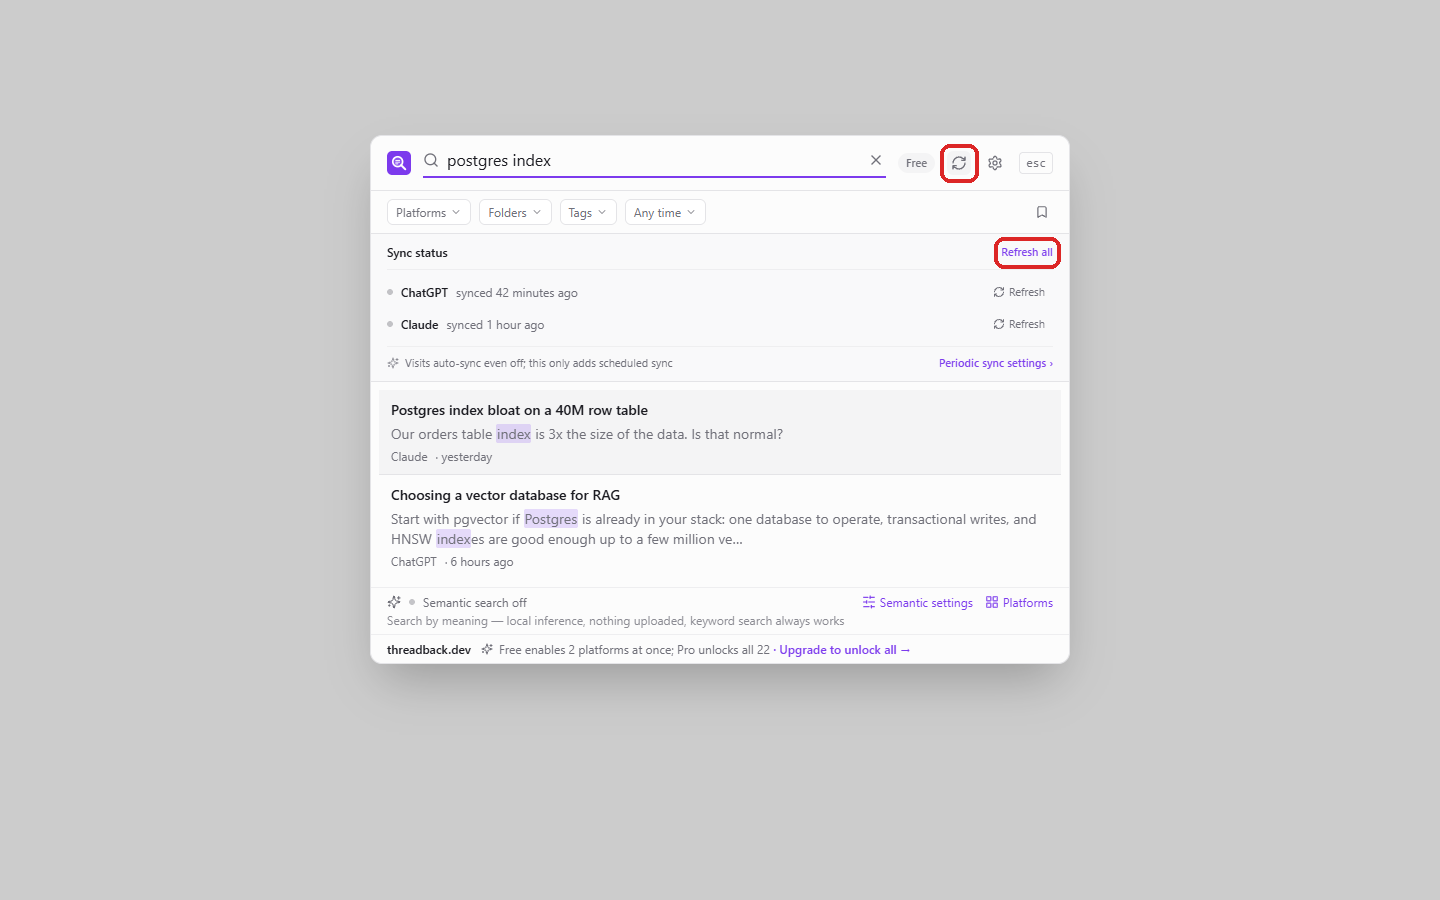
- Use the filter row above the results to narrow things down (section 3), and the sync icon beside the box to check syncing (section 7).
- While the first sync is still running you may see "Search index is still building, results may be incomplete" — you can search anyway, the results are just not complete yet.
Keyboard
| Key | What it does |
|---|---|
| ↑ ↓ | Move between results |
| Enter | Expand the selected result and read it in place |
| ⌘/Ctrl + Enter | Open that conversation on the original platform |
| Esc | Close the search window |
Read a conversation in place
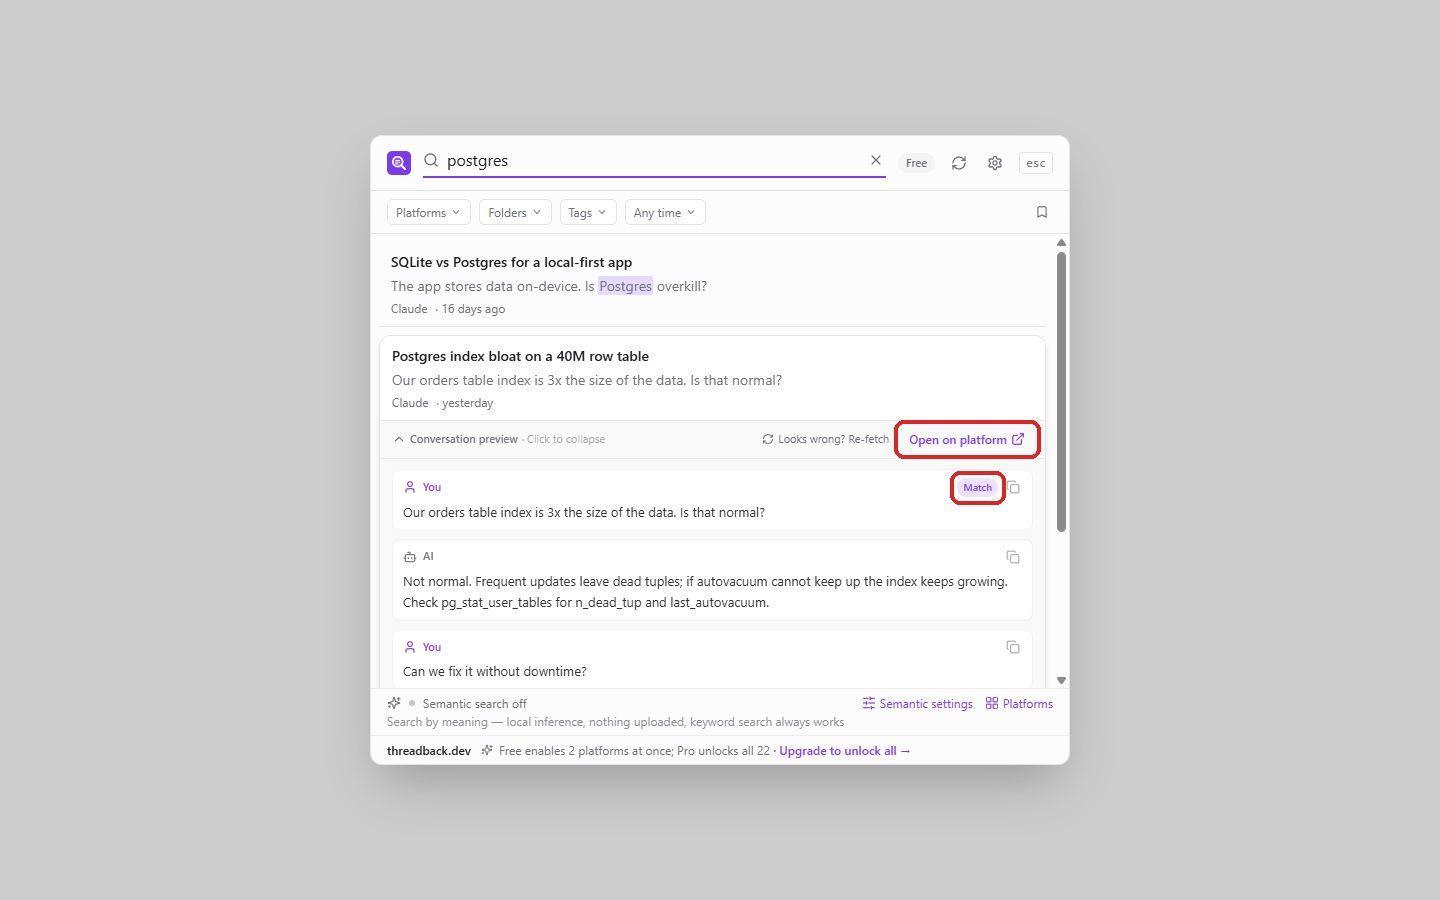
- Press Enter or click a result and the conversation expands right there — no need to leave the page you are on.
- The matching message carries a "Match" badge and highlighted keywords; hover it to "Copy" the whole message.
- The preview opens around the match. In a longer conversation, "Show N earlier" and "Show N later" at either end continue through the rest; a short one is shown in full, without those buttons.
- "Open on platform" at the top right jumps to the original conversation.
- Click the title bar again to collapse.
Looks wrong? Re-fetch that one conversation
- If a conversation renders incorrectly (for example the text shows up as raw code), click the refresh icon on the result row — "Re-fetch this conversation". The same entry sits in the header of the expanded preview.
- Threadback fetches just that conversation again and refreshes what you are reading as soon as it is done.
- If a whole platform looks wrong, use "Re-fetch everything" in the settings instead (section 7).
3. Narrow it down
Filters
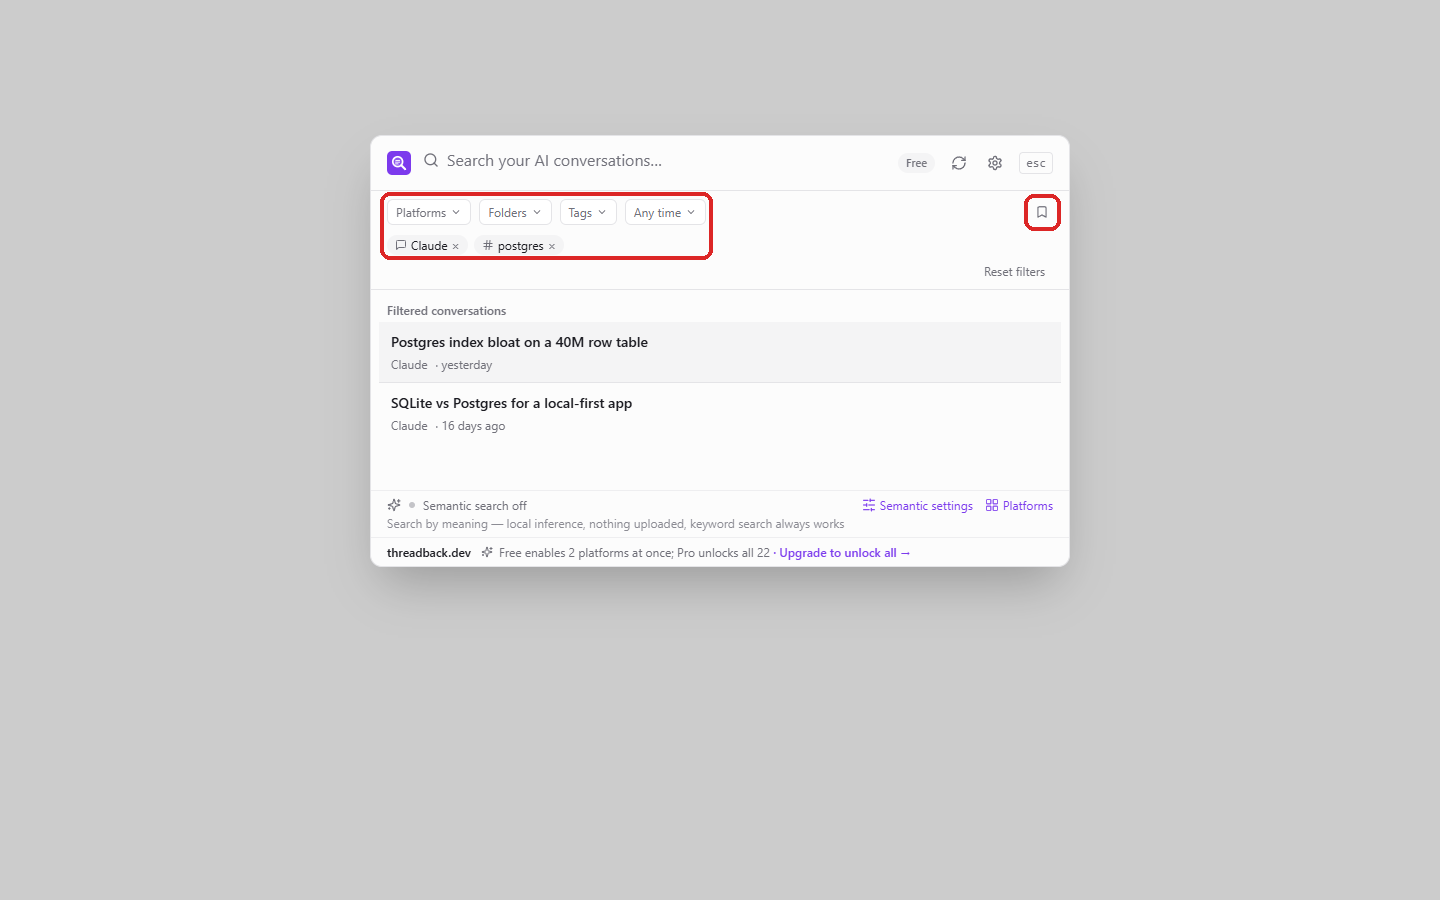
- Open a dropdown and pick what to keep: platform, folder, tag, or a time range (any time / last 7 days / last 30 days / last year).
- Platform, folder and tag are multi-select: within one dropdown it is "or", across dropdowns it is "and".
- Active conditions appear as chips below; click the × on a chip to drop it.
- Don't need a filter? Turn it off in Settings → "General" → "Search overlay filters".
Browse without searching
Leave the search box empty and set filters only: the window lists every matching conversation, newest first. That is usually faster than guessing a keyword when you want "whatever I discussed with Claude last week".
Save filters as a smart collection
- Once the filters are right, click "Save as smart collection" on the right and give it a name.
- Next time you open the search window with an empty box, one click on it under "Smart collections" applies the same conditions.
- Collections can also be managed and deleted in Settings → "Library".
Recent searches
With an empty box the window lists "Recent searches": ↑↓ to select, Enter to search, Delete to remove the selected one, or "Clear" to wipe the list.
4. Organize your library
Open the library
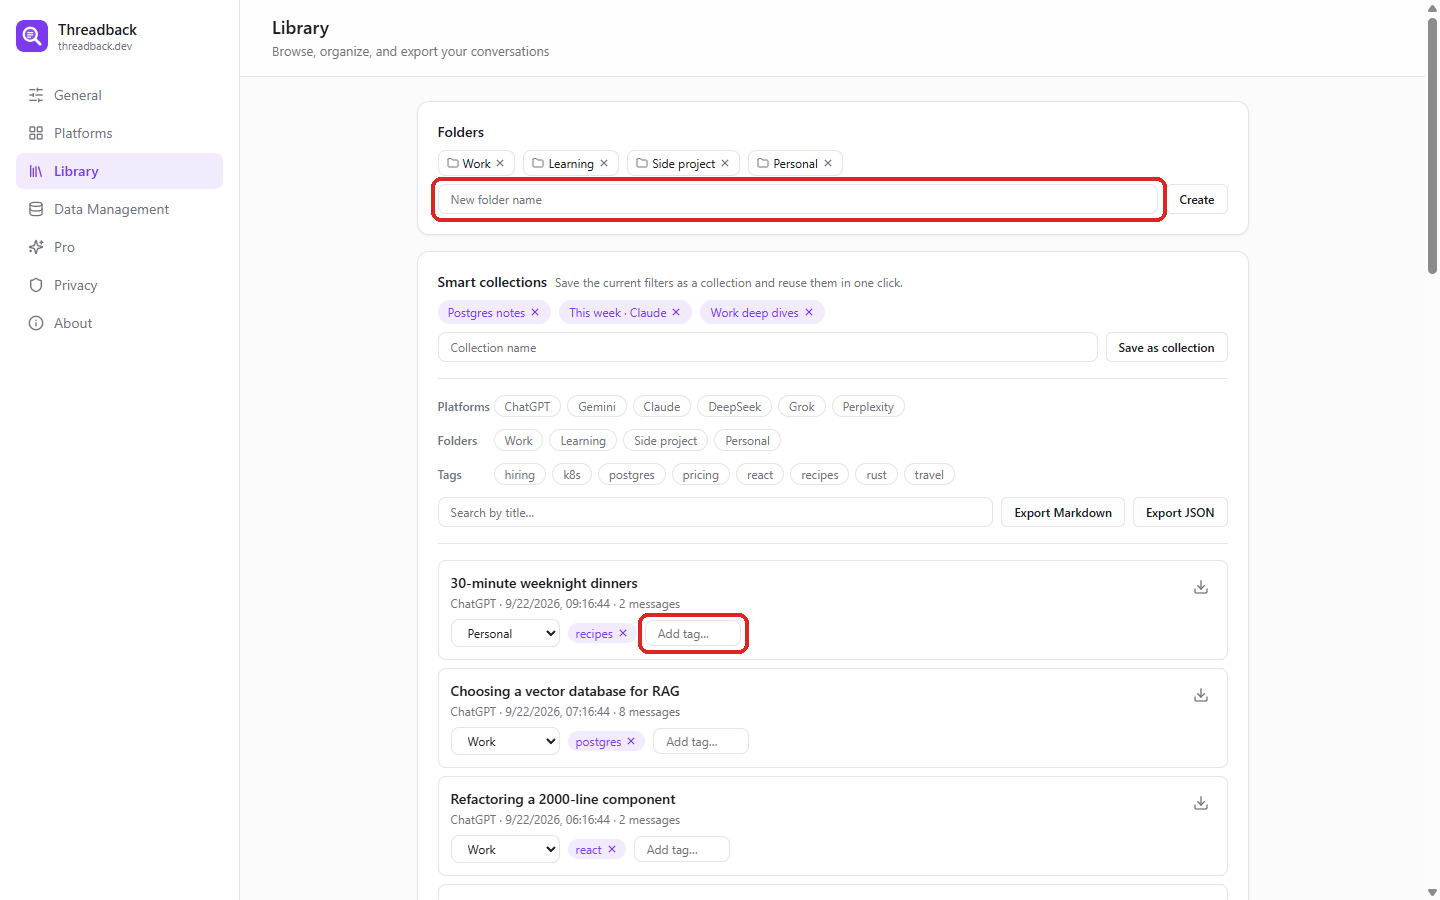
Click "Library" in the settings sidebar. It lists every synced conversation and is where organizing and bulk export happen.
Folders
- Type a name into "New folder name" under "Folders" and press Enter to create one.
- Pick a folder from the dropdown on a conversation row to file it there. A conversation belongs to one folder.
- Click a folder name to rename it, or the icon next to it to delete it (deleting a folder never deletes conversations).
Tags
- Click "Add tag…" on a conversation row and type a tag. A conversation can carry as many tags as you like.
- Select tags under "Tags" to filter. With two or more selected, a "Match all tags" switch appears — off means "any of them", on means "all of them".
Filtering, paging and source badges
- Combine platform, folder, tag and title filters ("Search by title…"); "Reset filters" clears everything at once.
- The list shows 50 per page, with previous / next and a page number box to jump anywhere.
- Some conversations carry a source badge (project, notebook, archived, pinned, group chat) showing where they live on the platform.
5. Export
Export a single conversation
Hover a search result and click the "Export as Markdown" icon to export just that conversation.
Bulk export
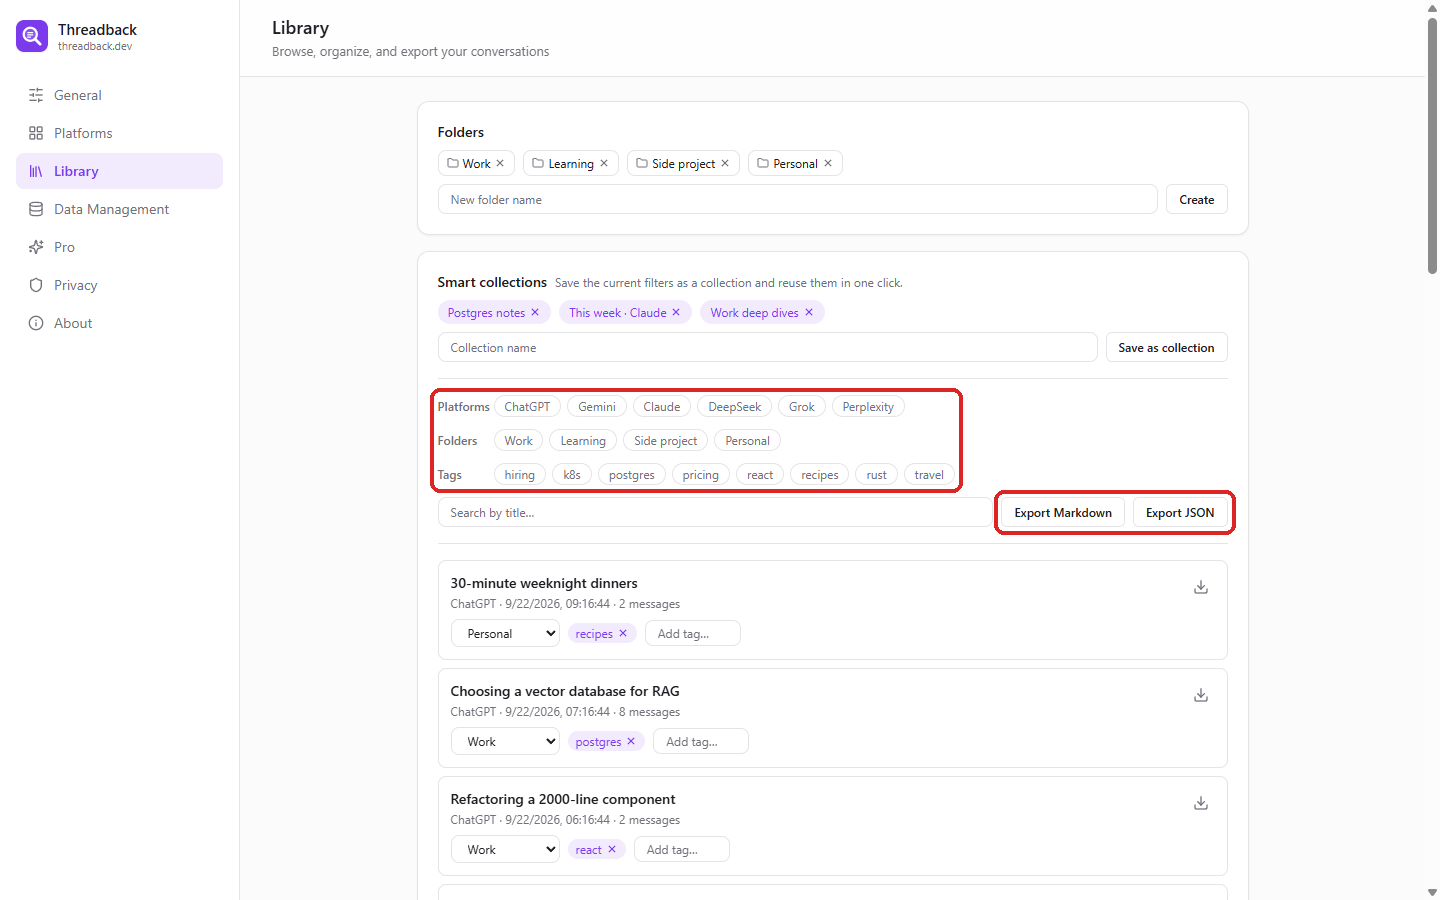
- In "Library", filter down to what you want (no filter means everything).
- "Export Markdown" writes one readable file, for Obsidian, Notion or plain reading.
- "Export JSON" writes structured data — conversations, messages and tags. Use this one for scripting.
- Large selections ask for confirmation first, and the button shows a percentage while exporting.
What the exported file looks like
In a Markdown export every conversation starts with a YAML header whose first line is threadback: conversation, followed by title, platform, original link, creation time, message count and tags. A merged file can therefore be split reliably on that line — a --- inside a message never gets mistaken for a boundary. The role headings follow your interface language, while the keys in the YAML header stay English, so scripts keep working whatever language you use.
6. Back up, move and clean up
Export all data / Import data
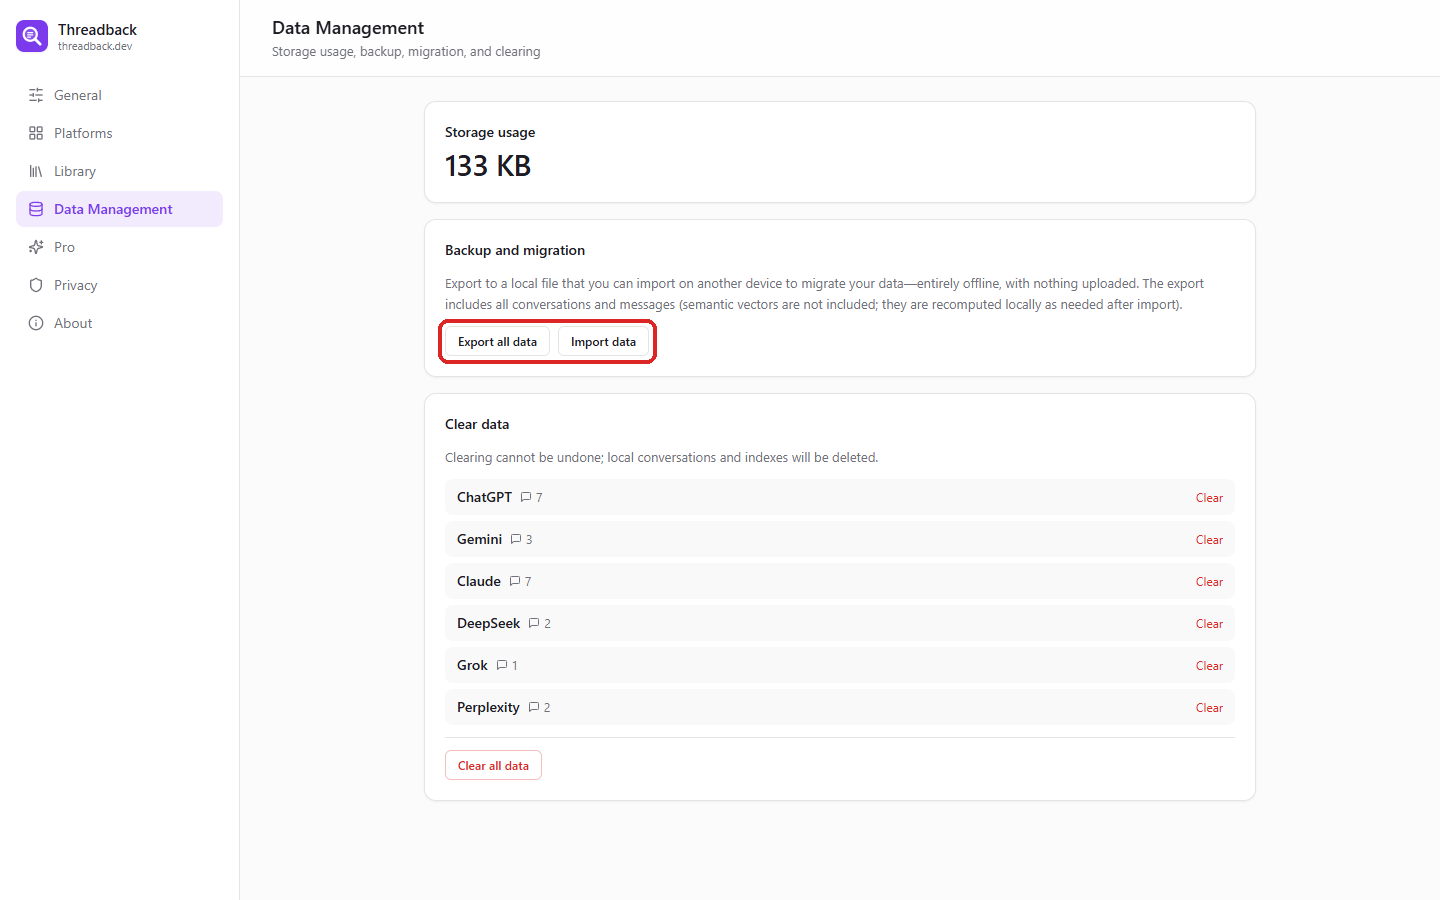
- Click "Data Management" in the settings sidebar.
- "Export all data" writes a complete backup: every conversation and message, plus folders and smart collections.
- Moving to another device: install the extension there, then use "Import data" on the same screen to restore the file.
- All of it happens on your machine; the file never passes through a server.
Storage usage and clearing
- Check "Storage usage" at the top when you want to know how much disk the local copy takes.
- Below it you can clear a single platform, or "Clear all data".
- Clearing cannot be undone. If you only want to repair data, prefer "Reindex" or "Re-fetch everything" from section 7.
7. How syncing works
Three ways it runs
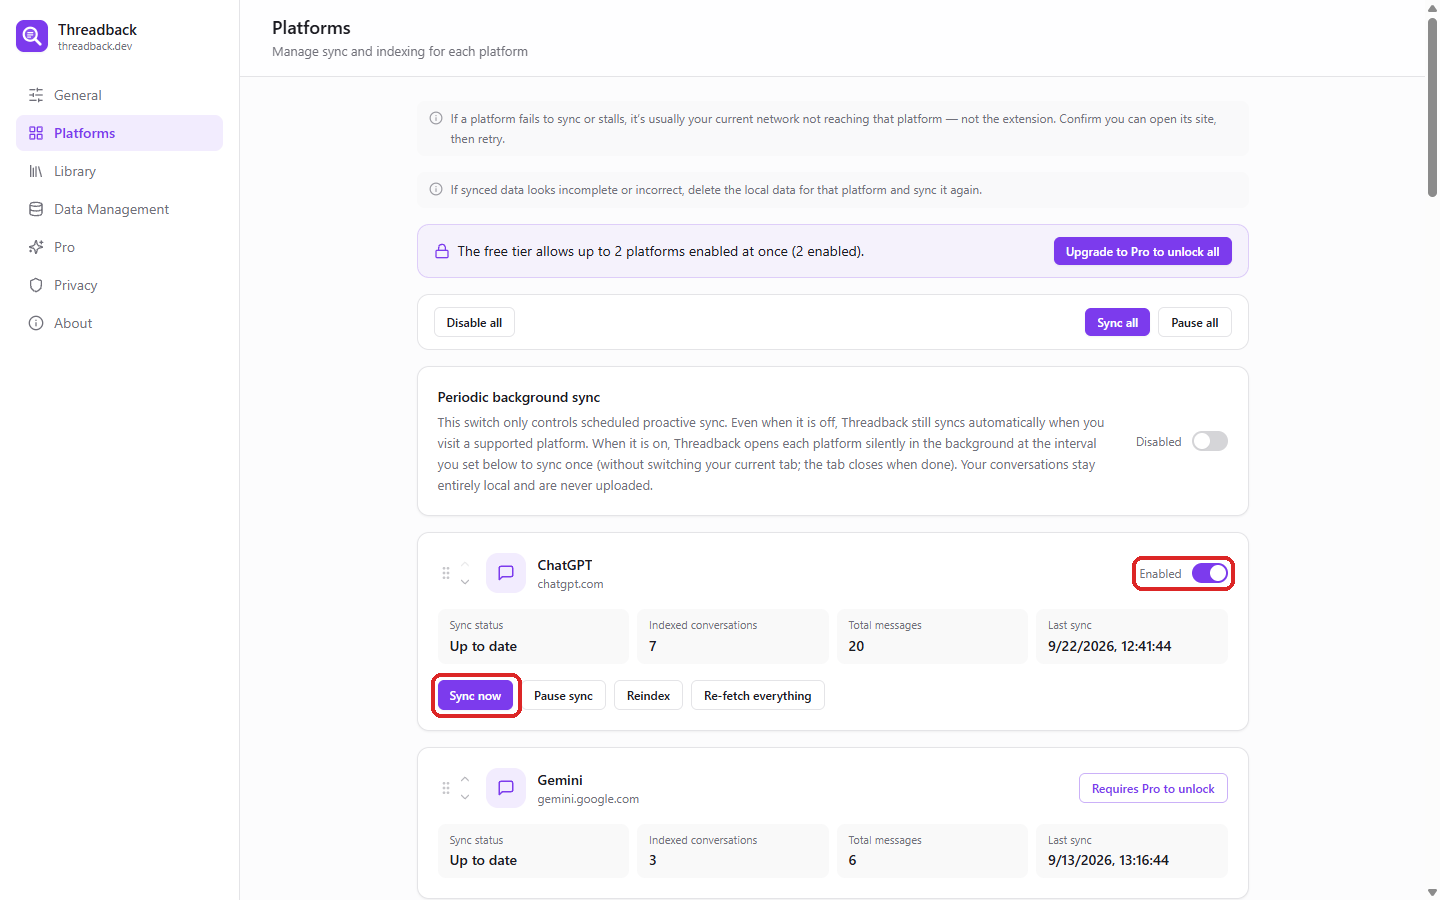
- On visit (default, nothing to set up): when you open a platform normally, Threadback reads new conversations locally through your signed-in session.
- "Sync now": click it on a platform card and Threadback opens that platform silently in the background for one pass, without switching your current tab.
- Periodic background sync: see below.
Use "Pause sync" on a card to stop one platform without disabling it, and "Resume sync" to start it again. When something seems to be missing, "Indexed conversations", "Total messages" and "Last sync" on that card are the first things to check.
Syncing uses your own session at a human-like pace. It does not consume the platform's API quota, and nothing is sent to any server.
Periodic background sync
- Turn on "Periodic background sync" on the "Platforms" page.
- Set the interval under "Sync every" (a recommended and a minimum value are shown).
- Threadback then opens each platform silently at that interval for one pass and closes it again, without switching your current tab.
- Leaving it off does not disable "on visit" syncing; this switch only controls the scheduled pass.
Reading the sync status
| Status | What to do |
|---|---|
| Up to date | Nothing, all good |
| Syncing… | It is running; search keeps working |
| Login expired… | Sign in on that platform, then click "Sign in again" or sync once |
| Can’t reach this platform… | Usually a verification check: open the platform once, then retry |
| Waiting for plugin update | The platform changed its API; wait for an extension update. Synced data and search are unaffected |
| N not synced yet… | It retries automatically, or click "Sync now" |
| N synced to recent messages only | Open a long conversation there, scroll up once until older messages appear, then sync again |
In the search window the same statuses open from the sync icon in the search box row, with "Refresh all" or per-platform actions.
Reindex and re-fetch
Two repairs for a single platform, from light to heavy. Neither touches your other platforms.
- "Re-fetch everything" starts right away in the background and pulls every conversation of that platform again, replacing each local copy as it arrives. Your folders and tags survive — the conversations are kept and only their content is refreshed. It takes a few minutes and resumes on its own if interrupted. Try this one first.
- "Reindex" deletes that platform's local conversations, messages and search index outright, then immediately starts pulling everything again in the background (the same as clicking "Sync now"); if you click it mid-sync, the current sync is stopped first. Because the conversations are deleted, the folder and tags you put on them go with them; folder and smart-collection definitions stay. Keep it for when re-fetching did not help — for example when the local index itself looks broken.
8. Pro
Activate
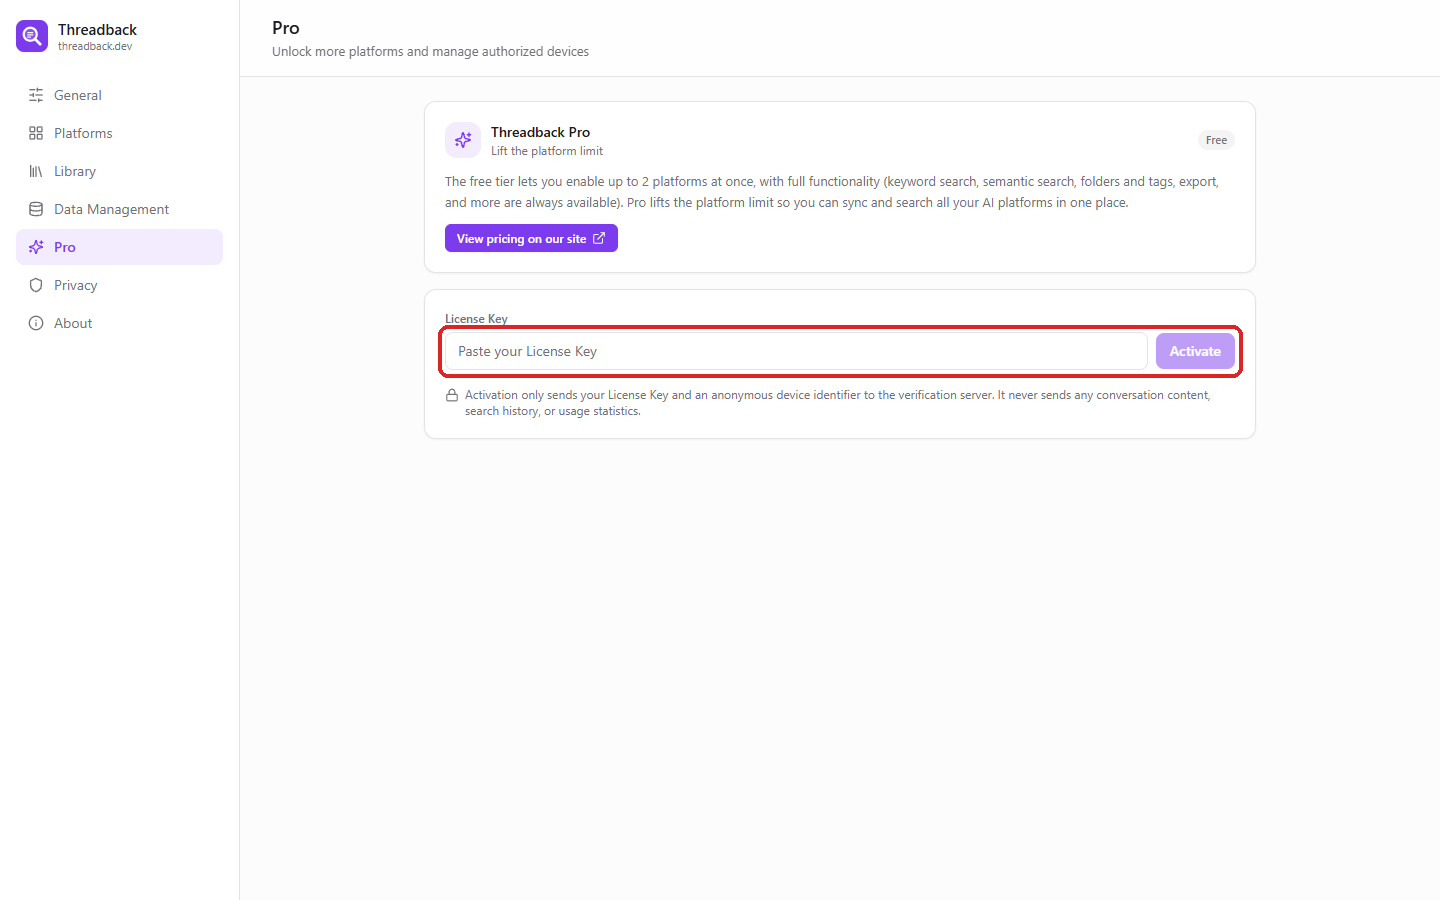
- Click "Pro" in the settings sidebar.
- Paste your key into "Paste your License Key".
- Click "Activate". The platform cap is lifted, and the expiry date (or "Perpetual license") appears at the top.
Pro changes exactly one thing: how many platforms you can enable at once. Search, organizing and export are identical on the free tier.
Devices
- After activation the page gains an "Activated devices" list: one key covers 3 devices at a time, with the current one marked.
- To move to another machine, click "Unbind" next to a device to free a slot.
- If the status looks off, "Re-verify" checks the license again.
- Activation sends only your License Key and an anonymous device identifier — never conversation content or search history.
Lost your key
Use the "Recover Key" page on the website and enter the email address you bought with.
9. Preferences
Shortcut
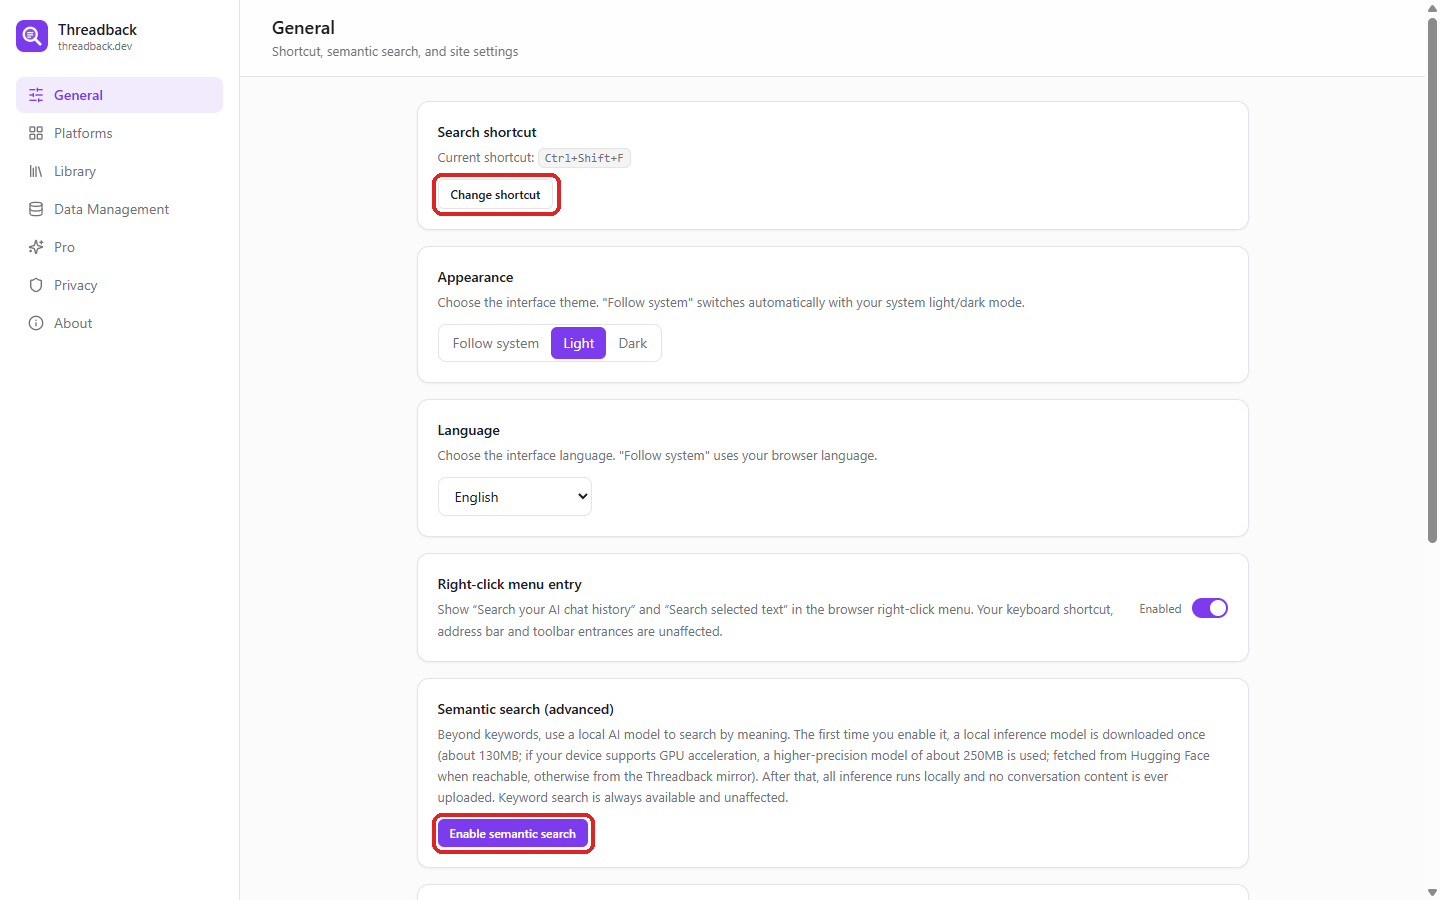
- Click "General" in the settings sidebar; "Search shortcut" at the top shows the key combination in effect.
- "Change shortcut" opens the browser's own shortcut page, where you can change it.
- If it shows as unassigned, another extension most likely claimed the same keys — assign one there.
Appearance and language
- "Appearance": light, dark, or follow the system.
- "Language": 14 languages, or follow your browser. Switching takes effect immediately.
Right-click menu, overlay filters, disabled sites
- "Right-click menu entry": turn it off and Threadback disappears from the context menu. The shortcut and address-bar entry are unaffected.
- "Search overlay filters": choose which filter controls appear in the search window.
- "Disabled sites": on the sites you add here, the shortcut will not open the search window.
Semantic search (optional)
- Under "General", find "Semantic search (advanced)" and turn on "Enable semantic search".
- A local model is downloaded once (about 130MB, or about 250MB with GPU acceleration); after that every search runs on your device.
- Beyond keywords, you can then find conversations by meaning. Such results are marked "Semantic" — the text may not contain your exact words.
- Keyword search always works and is unaffected. You can turn it off at any time and choose whether to clear the model cache too.
10. When something does not work
The shortcut does nothing
Check chrome://extensions/shortcuts — the browser leaves the shortcut unassigned when several extensions want the same keys. The right-click menu and the tb keyword in the address bar work either way.
Search finds nothing
Usually the platform is not enabled yet (Settings → "Platforms", 2 at a time on the free tier), you are signed out of it, or the first sync is still running. The Platforms page shows the status and conversation count for each one.
A platform stopped syncing
Use the status table in section 7: sign in again where the session expired; "Waiting for plugin update" means the platform changed its API, so wait for an update — everything already synced stays searchable.
Synced data looks incomplete or wrong
Start with "Re-fetch everything": it keeps your folders and tags and only pulls the content again. If that did not help, "Reindex" wipes that platform's local data and starts over — the folder and tags on those conversations go with it (see section 7). For a single bad conversation use "Re-fetch this conversation" on the search result.
Start over from a clean slate
Only if none of the above helped. First, what is and is not at stake:
- Your conversations are not at risk. Threadback keeps a local copy; the originals stay on each platform, and a fresh sync brings them back.
- What exists only here is what you built in Threadback: folders, tags and smart collections. Clearing drops the folder and tags attached to each conversation (they are stored with the conversation); uninstalling drops the folder and smart-collection definitions as well.
- Clear and re-sync: Settings → "Data Management" → "Clear all data", then open each platform again to pull everything in fresh. Don't want to wait for a visit? On the Platforms page, "Sync now" or "Re-fetch everything" starts the pull right away in the background — with the local copy empty, both do the same thing.
- Reinstall the extension: this also clears your settings and the organizing you did, and is the right move when you suspect the local index itself is broken. On Pro, unbind first — Settings → "Pro" → "Unbind this device / exit Pro" — otherwise that install keeps its device slot (3 per key) and every reinstall burns another. If you do run out, the activation screen lists the activated devices so you can unbind one and retry.
- After reinstalling, activate Pro again, pick your platforms and sync.
Do not export a backup first and import it back afterwards. You are here because the local copy looks wrong, and importing it would carry the same problem straight back in. Re-syncing from the platforms gives you clean data; folders and tags are quick to redo. "Export all data" is for moving to another device, not for repairing a broken copy.
Something else
Email support@threadback.dev with the platform and what you saw. A clear report usually turns into an improvement in the next version.